Friday, September 28, 2012

Fall Fashion: Boot Shoppin'

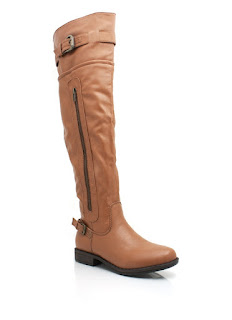
I have been on a quest. A quest for gray boots. It's of the upmost importance.

Well, not really. But I do want some.

I've scoured the internet for boots. Literally, if a site sells boots, I think I've found it. While I haven't found the exact pair that I want (yet!) I have found some new and awesome sites that sell boots. I thought I'd share them with you!

Looking for boots that don't cost an arm and a figurative leg? Try Urbanog.com - I don't think I saw a single pair for more than $40. Here's an example - this pair is listed for $37.80.


Another site for inexpensive boots is GoJane. This pair is listed for $38.40:

Endless.com is another site that I stumbled upon. They have designer boots for discounted prices. These Anne Klein's are less than $60:

6pm.com is a site you might have heard of. They also have designer brands for discount prices. These Frye boots are 42% off:

And of course, always be sure to check out the latest sales on RueLaLa and Zulily. I've found some great deals there as well, you just have to be sure to check everyday since the sales change daily. 

PS - The only sites so far that I have purchased from are RueLaLa and  Zulily, so I can't say anything about quality/shipping from the other sites; I just thought they had some good deals worth passing along!

Updated to add: Jane is also a great site to check!

Thursday, September 27, 2012

Big Waves for Fine Hair

I feel so silly writing any posts about hair. I wrote one recently that you can find here on getting big, beautiful hair. I only did that because I've struggled with doing my hair for...um, ever. 

My hair is literally baby fine. Supposedly I have a "lot" of it, but seriously, you should see it in a ponytail. It looks like a 3 year old's hair! No, I take that back, I think some 3 year olds have thicker hair than I do.

Because of how fine my hair is, it tends to be really lifeless. I've tried dozens of hair tutorials. All of the ones I've seen are from girls with thick hair that looks so pretty without them having to do anything to it! I had an appointment with my friend and stylist yesterday and I begged her for curling tips. I see all these girls with their big beautiful waves and I want that too! Ha!

Here is what it looked like when Julie did it:

And this is a superbad pic of me in the car today (not driving!) after having curled it myself!
Obviously, Julie's is much better but there is wave in my hair and I did it! Ha!

I was talking about it on Twitter and several of you asked for the tips that Julie taught me, so here you go:

- Product: I used a foam mousse and Julie used a root lift (she used Pureology Root Lift, I used a mousse I had from Garnier) before drying my wet hair. PS - Dry it like I do in this tutorial.

- Section It: Horizontally divide your hair into three sections. Clip the top two up on the top of your head and start with the hair at the bottom.

- Take a 1-1.5" section of hair and lightly spray it with hairspray. Using a 1.25" - 1.5" barrel, curl your hair away from your face while keeping the iron completely vertical.

- Release hair and repeat with remaining sections working up towards the top of your head.

- Lightly run your fingers through your hair to break up the tight curls a little, then spray with hairspray.

It probably took me about 5-10 minutes longer to do this as opposed to straightening my hair and I was really happy with the look! A big thanks to Julie who needs to start a hair blog to teach us all of these tricks!

Wednesday, September 26, 2012

Decisions, Decisions: A Home Building Update

We like to do big life events all at once.

When Chris & I built the house we live in now (which was not a fully custom house) we were getting married. I can't believe that was 7 years ago! Now, we're trying to adopt as well as building a fully custom house. We made it through before and we're trucking right along just fine now so I feel pretty confident that nothing can split us up! Ha! 

I've been asked several times for a house update. It's not that there isn't a ton going on, it's just hard to "show" you what's been happening because we're in the picking stuff out stage.

I do have some tips for those of you who are doing a remodel or building or thinking about doing one of those though, so I thought I'd share those today!

First, I highly recommend starting a Pinterest board for all the dream home ideas that you find. If you want to go through mine, you can find it here. I use this board to find a cohesive style that I like, and  hen to narrow down specific items that I like (their brand, where to buy them etc). I pin things from all over - Houzz.com, blogs, re-pinning from others dream home boards, Lowe's, Home Depot, specialty tile stores, you name it.

Next, take a scouting trip. Go to the granite supplier, the flooring store, meet with you cabinet maker. See what they have to offer and get a feel for what you like. We took our first trip when our house was being framed.

Last week I went back to the flooring and granite places again. This time I narrowed down our granite selections so that I can get them priced out. Our local granite supplier is SO nice - they encourage you to come out and you can spend as much time there as you want. They have this huge lift so if you want to see a huge slab of granite, they bring it out to the center of the shop for you; that way you can see all of the patterns.

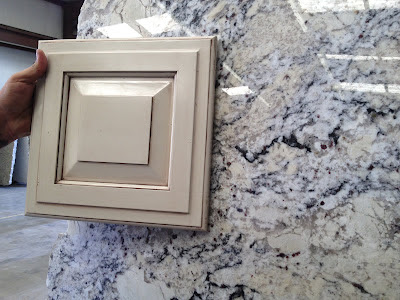
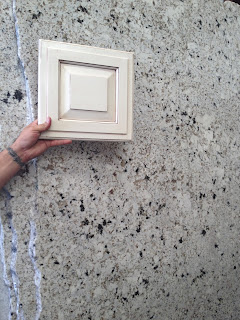
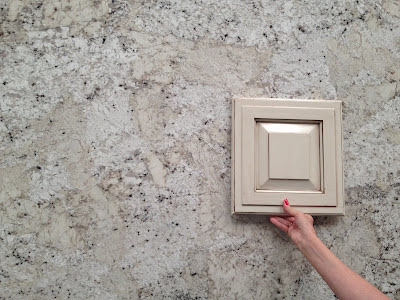
A great tip is to get a cabinet sample (this isn't the exact look of our cabinets but its pretty close) and take that with you to match with the granite. You can easily rule out some colors this way! One in particular that I really liked completely clashes with our cabinets, so I'm really glad I did this!

Here are a few of the colors that I looked at:
(Edited: I've received a ton of emails asking about the tile colors! In order, they are:
Fantasy White, Giallo Ornamental, Delicatus, Andino White & White Ice. Also, you can view the finished product in my kitchen here with even more pictures while it was being installed here.)


When I went to the flooring and tile store, I didn't have a granite sample but I did have a piece of another countertop sample that I thought would be fairly close to what I'd end up with. I used those to match up with my backsplash subway tiles. I'm probably going with that lightest blue in the subway shape.


When it came time to pick out carpet for the upstairs along with the upstairs bath tiles, I matched all of those samples together too. Below is the carpet, tile and grout.
And last but not least, this isn't a tip, but it's a picture of 2 of the hardwood colors we're looking at:


Chris sent me a text that they've started drywall and bricking today! I'm so excited! Once things start going in, I'll be able to share some pictures with you all!

Monday, September 24, 2012

Apple Turnovers

If you peruse my dessert section you'll probably notice a trend...chocolate! I am a self-proclaimed chocoholic. If I can sneak chocolate into something, I will.

Every once in awhile there is an exception to the rule. As is the case with these apple turnovers. They (and I can't believe I'm going to say this) just don't need the chocolate!


Apple Turnovers
Source: JennaBlogs.com

6 gala apples, peeled and diced
1 cup water
½ cup white sugar
1 teaspoon lemon juice
1.5 teaspoons cinnamon
¼ teaspoon allspice
¼ teaspoon nutmeg
¼ teaspoon salt
1 package (2 sheets) puff pastry
Eggwash (1 egg + 1T water, mixed well)

Combine all ingredients except puff pastry and egg wash in a pot. Bring to a boil then reduce to medium heat. Cook about 30 minutes or until apples are tender but not falling apart.

Meanwhile, prepare your pastry. Roll out and cut into squares. A 4” square is a good size (shown above), but if you want large pastries, do a 6” square. 

Place filling into the center of the square. Use egg wash around the edges and fold into a triangle. Use a fork to seal the edges shut. Cut a vent (2 if doing a 6” square) into the top and place on a lightly greased baking sheet.

Bake at 400 for about 15 minutes or until golden.

Friday, September 21, 2012

Creamy Tomato Soup

Tomato soup is one of my favorite comfort foods. I've been under the weather and so I made this the other day for lunch...and dinner. And possibly dinner again.

I have another tomato soup recipe posted here which is great if you're in a hurry, but this one is my all time favorite.

PS - If you don't like the heat, leave out the red pepper flakes.


Creamy Tomato Soup
Source: JennaBlogs.com adapted from Peas & Crayons
Makes about 4 bowls

1 14.5oz can tomato sauce
1 14.5oz can fire roasted tomatoes
1 yellow onion, chopped
3/4 cup chicken broth
3-4 cloves chopped garlic
1/4 cup chopped carrots
8oz reduced fat cream cheese
1/4 teaspoon salt
1 1/4 teaspoons sugar
1/4 teaspoon red pepper flakes
Shredded cheddar for topping

Chop veggies. Saute onions, carrots and salt in olive oil until soft, about 5 minutes. Add garlic and cook an additional minute.

Add roasted tomatos, sauce, broth, sugar, pepper flakes and cream cheese. Simmer over low for about 30 minutes or longer, being sure to stir occasionally. Taste for seasoning.

Carefully ladle the hot soup into a blender and processes until smooth.
NOTE: Cover your blender with a towel to avoid any burns from the splattering soup!!!

Top with cheddar and enjoy hot!

Thursday, September 20, 2012

He Gives & Takes Away: An Adoption Update

I've been needing to write this post for a few days but I couldn't seem to find the right words. I still haven't really found them but I'm going to give it a go.

With adoption, sometimes there are stories you can't tell and things you can't share. This is one of those things. While I can't share details, I did promise to share as much about our journey as I can.

Basically, we thought that we might have found a birth mom. She was due very soon and very sure that she wanted to find adoptive parents. It's not for me to share her situation, but because of the circumstances she knew that she wanted to find a good, Christian home for her daughter. An acquaintance of ours who knows that we are wanting to adopt shared our info with a friend of the birth mom's and she was going to pass it along. We were so excited!

To make a long story short, we just found out that she has changed her mind. She has decided to parent.

I know all of the things that you are supposed to say here. How I support her decision and how I think she will do well. And I truly hope that she will. I wish her nothing but the best and they are both in my prayers.

But it still hurts.

I told Chris that I can't imagine going through this without my boys. I have two of the most awesome kids on the planet and I get to be with them everyday and shower them with love and attention. And we are okay.

I learned many lessons when we went through infertility. They were lessons that I didn't want to repeat. The most important thing I learned during that time was to trust in God, give Him full control and know that he wants what is best for me. I tend to be a control freak and I had to learn the hard way that I am not in control and furthermore, that I don't want to be!

I know that God has called us to adoption. And I know that His plan always works for good. Another lesson I've learned in life is that there is always a reason that things happen the way that they do. Maybe I don't see it now, and maybe in a year I still won't, but at some point it will make sense. And because I trust that God knows best, and that His plan is best, I will rest in that assurance.

Job 1:21 "The Lord gave and the Lord has taken away; blessed be the name of the Lord."


Wednesday, September 19, 2012

Creamy BAKED Chicken Taquitos

I just love logging into my blogger account to see that everything has changed. Grrr. I hope this post turns out alright!

This may come as a shock, but we love Mexican food in our house. Hence I have a whole food tab devoted to it up there in the recipe box at the top of the page. ;-)

I've always heard that taquitos and flautas are the same thing, the only difference being the tortilla that's used. Corn = taquito and flour = flauta. I have no idea if that's true, and I didn't want to confuse anyone by calling these flautas, even though I think that's what they are. 

Let's just call them creamy baked chicken sticks of deliciousness. 


Cream Baked Chicken Taquitos
Source: JennaBlogs.com

Ingredients:
Tortillas (corn OR flour): I used 7" tortillas
3 cups shredded, cooked chicken breast
1 cup shredded montery jack cheese
6 oz 1/3 less fat cream cheese (3/4 of a block)
1/4 cup minced yellow onion
1/4 cup chopped cilantro
3-4 cloves minced garlic
1/2 tablespoon lime juice
1/2 tablespoon paprika
1 teaspoon chili powder
1 teaspoon cumin
1/2 teaspoon salt
1/4 teaspoon cayenne pepper

Directions:
Preheat oven to 425. Line a baking sheet with foil and spray it with cooking spray.

Mix chicken, cheeses, cilantro, onion, lime juice and spices together.

Heat tortillas, 5-6 at a time for 30 seconds, wrapped in a damp paper towel. This will keep them from splitting and breaking. Fill with desired amount of filling (I used about 3T) and roll. I prefer to do this with the wet hand/dry hand method. I keep the tortilla in my left hand, use my right hand to put the filling in the tortilla, then using a flat palm, roll the filling back and forth over the tortilla to form a cigar shaped log of filling. Then wrap the tortilla tightly around and place it seam side down on the baking sheet.

Once you've finished, give the tops of the taquitos a light spray of cooking spray. This will help them brown and get crispy.

Bake about 20 minutes or until crisp and lightly golden. I made 14 from this recipe which was enough for 2 nights.

Serve with sour cream and guacamole.

Tuesday, September 18, 2012

Sick Days & School

Brayden missed his first day of school today. I feel the need to document this, just like I did his first day of school, ha! He is so rarely sick! Last week I mentioned he had a stomach virus and now he seems to have a bad head cold. Poor guy. He sounds terrible and it didn't seem like a good idea to send him.

You can't tell he's sick unless you hear him try to talk!
Speaking of school, Brayden is having an absolute blast with Pre-K. He has so much fun each day. They have library time, music time, chapel time, learning time and playtime. Right now he is learning to write his letters. He gets so excited to show me his projects from that day and each week he brings home a library book for me to read to him.

Brody is so happy Brayden was here today!
Each month his school sends a book order form home. I can order books for his collection and the school gets some for their library. I've made it our tradition to sit down and pick out the books that he wants. Right now his favorites are the Berenstain Bear books. They were my favorite as a kid too!

Here's to hoping my sickie boy gets well soon!

Monday, September 17, 2012

Bacon, Chicken, Ranch Ring

One of the most popular recipes on my blog has been the Mexican Chicken Ring. So many of you have asked me for a new version of that, as well as a new version of the famous Chicken Rollups (by the way, there is another version - the Pepperoni Rollup!)

The result was this - my Bacon, Chicken, Ranch Ring! The good news is that you can make this as a rollup to! You'll have all of the ingredients, and it's up to you how you put it together. Either way, it will taste AWESOME!

Bacon, Chicken, Ranch Ring
Source: JennaBlogs.com

Ingredients:
3 cups shredded, cooked chicken breasts
7 strips cooked bacon, chopped into small pieces
2 green onions, chopped small
1 cup monterey jack cheese, shredded
1 cup thickened ranch dressing (information to follow)
2 cans of crescent rolls (not jumbo!)

For the dressing:
Mix 1 cup mayo and 1/2 cup buttermilk (or 2% milk with 1T lemon juice or white vinegar) with 3T ranch dressing powder. Dressing should be thick!

Directions:
Poach chicken: I usually buy 2 bags of frozen boneless, skinless chicken breasts and poach them all at once, then throw them in my stand mixer with the paddle attachment for about 45 seconds. Then I divide them into ziplock bags with about 3c of shredded chicken in each, and freeze them!

Prepare dressing. Note: it needs to be thickened. If you want to use bottled dressing, mix in some mayo. If the dressing is runny, the filling will not hold together.

Cook bacon.

Next, combine your chicken, dressing, bacon, green onions and cheese. Make sure it's well combined.

Grease a baking sheet and open your crescent rolls. Lay them out, overlapping, in a circle. Using your hands, mold the filling into a ring around the dough (pictured below). If you try to do this with a spatula it will fall apart, so use your hands! Then, fold the points of the crescent rolls in over themselves (pictured below) and tuck them under the ring.

Top with additional cheese if desired. Note that if you do use additional cheese, it might make the crescents look like they aren't cooked yet (see my pic up top for an example). They are cooked, it's just that the melted cheese looks like raw dough!

Bake at 375 for 20-25 minutes. Serve hot!

Enjoy!

Use your hands to mold the filling into a circle:
How to fold the points over:


Follow me for more great tips!
On Twitter

Sunday, September 16, 2012

This {lonnng} Weekend

Is it Monday yet?

Darn.

This has been a lonnnng weekend.

50% of my household has been really ill - Brayden and Chris have both had what seems to be a stomach virus complete with fever since Thursday night.

Of course, with Brayden, it's hard to tell. If it wasn't for the fact that he was running a fever & throwing up, you wouldn't know anything was wrong with him. This is how I found him Friday morning:
Chris ended up coming home from work on Friday and he passed out on the couch. I ended up having to wake him up after several hours. Poor guy.

PS - I'm sure he will appreciate the fact that I not only took, but blogged this picture.
My days have been filled with Lysol and boys in sweatpants. Brody and I tried to keep from getting the virus and succeeded. Yay!

I did end up working on a few new recipes this weekend for my bunch. Here's a sneak peak of one I'll post tomorrow. Any guesses?

(Hint: It's a new version of one of my most popular recipes!)

And today, while everyone but me was asleep (ahem, now!), I've been perusing Pinterest. I find that I look at it the most on the weekend when things are calmer. I need more boards to follow!

Leave me a link to your board in the comments please! You can find me here.

Friday, September 14, 2012

GIANT Pumpkin Chocolate Chip Cookies

It's no surprise that I love chocolate chip cookies. In fact, I have three recipes (and more coming) just for chocolate chip cookies on this blog! It's also no surprise that I love pumpkin! So, what happened when I combined the two?

This - GIANT Pumpkin Chocolate Chip Cookies!

I used a recipe that I have been working on for about three years. It's a copycat of the famous Levain Bakery ginormous cookies! This is by far the closest I've gotten to their cookies BUT I added pumpkin!

And in case you want them, here are the links to my other chocolate chip cookie and pumpkin recipes:


Giant Pumpkin Chocolate Chip Cookies
Source: Jenna Blogs

Ingredients:
2 sticks cold, unsalted butter, cubed
1 egg
1/2 cup pumpkin puree (NOT pumpkin pie mix)
1 cup tightly packed brown sugar
1/2 cup white sugar
3.5 cups all purpose flour
1 tablespoon cornstarch
3/4 teaspoon salt
1 teaspoon baking powder
1/2 teaspoon baking soda
2 cups semi-sweet chocolate chips

Preheat oven to 350.

Whisk together flour, cornstarch, salt, baking powder and baking soda.

Cut butter into cubes. Cream in a mixer with both sugars. Once the butter is the size of peas, add in the egg followed by the pumpkin. Next, add your dry ingredients in 3 stages. Fold in chips.

Do NOT grease your pans. Using a spray, butter or oil encourages cookies to spread. You do not want that. Instead, if you have good, nonstick pans, use those, or line a pan with parchment.

Make big rounds (about 1/4 cup each) of dough. Using your hands, quickly mold them into circles. Try not to touch them too much because you don't want to melt the butter.

Place 6 rounds on each tray. Freeze the rounds for 10-15 minutes. This is very important!

Take the pans directly to your oven. Bake for about 20 minutes, or until the cookies are just done. Let cool on the sheet pans. If you move them before they have cooled, they will likely deflate.

This recipe makes about 18 large cookies.

Wednesday, September 12, 2012

Good Mail Day & A Bargain

Don't you just love a good mail day? Nothing makes my day like a package waiting in my mailbox or on my doorstep.

I had a really bad day earlier this week, and it's amazing how a delivery can change my attitude. I had store credit with The Blue Door Boutique, and I used it to order a couple of scarves. This is the leopard print scarf I mentioned here. I also ordered a houndstooth one. I've seen similar ones available for great prices on Zulily.
About 15 minutes later, Chris got home. He always brings the mail in and he had another package for me! I had ordered these bubble necklaces off of Amazon for $16.99! I love them!

You can find this necklace in a multitude of places. I've seen offers on Facebook for around $25, and I purchased mine for even less on Amazon. I've seen them before on Rue La La and Zulily too.
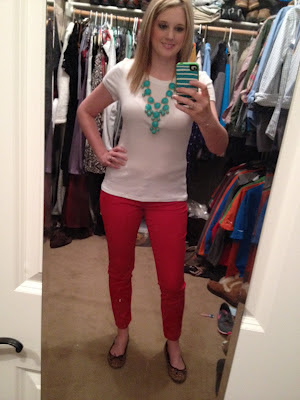
Remember when I shared some great deals for fall fashion? If you missed that post, you can find it here. I thought I would show you an outfit put together.

Necklace: 16.99
Shirt: Less than 10 at Old Navy last year
Pants: 22.99
Shoes: 19.94 (still available at Old Navy)
Unfortunately, shortly after I tried the pants on I realized they had been sent to me damaged. I won't get into the whole saga, but I don't know that I'll be purchasing any clothing from Target again. They make returns SO HARD. It just wasn't worth it. I know Old Navy and Forever 21 both offer colored pants like mine, and Old Navy is SO GREAT about returns!

As a sidenote, I have to say that my family was s.h.o.c.k.e.d to see me in anything other than blue jeans. Haha!

I changed into another pair of colored pants, also for 22.99.
Oh, and please excuse my messy closet. I'm one of those people who try on 10 different things each morning, and my closet is perpetually messy. Just keeping things real. A Stepford wife, I am not.

Don't you just love good mail days?!

Tuesday, September 11, 2012

Chocolate Chip Pancakes {from scratch}

I'm a bisquick girl. There. I said it.

Yes, I like to make pies, cakes, 5 hour dinners all from scratch but I use bisquick to make pancakes. Oh, and garlic cheddar biscuits. My mom always used it and I just like the taste I guess.

All that went horribly awry one day last week when I RAN OUT OF BISQUICK. It took me several minutes to remember that people make pancakes from scratch. As an avid baker, I knew I would have what I needed on hand. I did a quick online search for a basic pancake recipe, because at 8am I do not have the competency to come up with my own. A morning person, I am not. So I started with a Martha Stewart recipe because I figured Martha is a pretty reliable source. I've worked on it since then, so I'm calling this one my own.

PS - I am not a breakfast person. That's why you don't see a ton of breakfast recipes from me. I hate eggs. Not a fan of oatmeal. Stronnnnngly dislike most cereals. But my mom figured out when I was a little girl that I would chow down on some chocolate chip pancakes. She made them for me almost every morning from grade school - senior year. Yep, I have the best mom on earth. She still makes them for me when we all stay at our family cabin for Christmas.

Now I make them for my boys and cough, ahem, myself. I want them to have a mommy that makes them this special treat until they grow up and leave home. Now I'm gonna cry.

Chocolate Chip Pancakes
Source: Jenna's Journey Blog, adapted from a Martha Stewart recipe

1 1/4 cups all purpose flour
1 cup milk
2.5 teaspoons baking powder
2 teaspoons white sugar
2 melted tablespoons unsalted butter
1 egg
1 pinch of salt
1/3 cup chocolate chips

Mix all ingredients EXCEPT the chocolate chips together. Heat a skillet over medium heat and coat with cooking spray or melted butter. Pour pancake batter, then stud with chocolate chips. Cook until bubbles appear, then flip, and cook for about 20 seconds on the other side so as not to burn the chocolate.

ENJOY!

Friday, September 7, 2012

White Chicken Lasagna

When I first heard about this recipe, I knew I'd want to try it out. I mean, doesn't it just scream "fall meal"?!

I've made some changes to the original, so be sure to give my version a try!

White Chicken Lasagna
Source: Jenna's Recipes, adapted from Real Mom Kitchen

2 cans evaporated milk (do not use the non-fat version)
4 generous tablespoons ranch dressing powdered mix
4 cups poached, shredded chicken (or rotisserie chicken)
6 cooked lasagna noodles
2 c shredded cheddar
2 c shredded mozzarella cheese
1/2 teaspoon pepper
1/4 teaspoon salt

Poach chicken. Once cooked, shred it (when I do this, I cook way more than I need, and throw them into my stand mixer for about 1 minute to shred it. Then I freeze the leftover). In a medium saucepan, combine milk, pepper, salt and ranch mix. Whisk well, for about 2 minutes over medium heat. Add the chicken. Reduce heat to a simmer. Let simmer, stirring occasionally, for about 20 minutes.

Meanwhile, cook your 6 noodles and shred your cheese. Also, preheat your oven to 350. Once noodles and sauce are cooked, layer them into a well greased 9*13. First, one layer of 3 noodles, topped with half of your chicken mixture and half of the cheeses. Repeat, ending with your cheese.

Bake for about 30 minutes. If desired, once baked, turn your broiler on to add a little bit of golden brown color to the top of the dish.

Serve hot.

Thursday, September 6, 2012

Fall Fashion for Under $25

While I don't claim to be a fashionista, I did work in the fashion business before becoming a SAHM. In the recent years stores have really come forward with cute, trendy clothing for a reasonable price. I don't know about you, but if I think something is a fad, I'm not willing to spend a lot of money on it. I'd rather invest that into things that will last me a really long time, like a great pair of boots, or a nice pair of jeans.

So, I thought I'd put together a post of things I've actually bought myself for the fall season. Only 2 items were no longer available online, but I found a great replacement for you.

Let's start!

First up, it's no surprise that leopard is a big trend again this year. I like it in small doses, like this scarf. I bought mine from The Blue Door Boutique this morning but they've already sold out, so here is a very similar one from Cache. It is on sale for only $19.20.

Next up - leggings/tights/jeggings. I bought this great mustard pair this morning at Target (incidentally, I went there for soy milk. I left without soy milk but with seven bags of random stuff that I didn't realize we needed. Huh.).

I also bought a pair of dark blue jeggings for $10. They aren't online yet. I tried them on and I may even use them for our family pictures in October!

Leggings: Target, $8

Tunics! I love them. They are SO forgiving. After 2 c-sections I don't think I will ever again have a completely flat stomach. I bought this one today at Target in another colorway. Mine looks awesome with my new jeggings.

Tunic: Target $22.99


I'm sure this isn't the first time you've seen skinny, colored jeans. These are actually baby wale cords. Baby wale just means that the little raised lines are small and tightly together. I purchased these online from Target a couple of weeks ago in mustard and mint. They are great with boots, and a nice way to add a splash of color!

Note: I tried the Old Navy version of these and it was like paint on my skin. Seriously, they were tighter than leggings. It works for a lot of people, I'm just not one of them, so be sure to try these on at several places. I wouldn't recommend just buying them online without trying them on!

Cords: Target $22.99

Here's another thing I bought in multiple colors, including the one pictured here. This is a jersey cargo shirt from Old Navy. I tried it on in the store and LOVED it. I ordered it in mint, royal blue and winter white. This is a flattering fit and it will go with everything, including those colored jeans/cords!

Jersey Cargo Top, Old Navy $16.50


Last but not least, here's another splash of leopard. I traded in my heels for flats when I had kids because I'm not the most coordinated person you'll ever meet, and heels while carrying a baby around would equal disaster for me. I've wanted a pair of leopard flats for the last 2 years but couldn't find one I looooooved. I stumbled upon these at Old Navy and bought them on a whim. I am SO GLAD I DID! I wear them all the time. They are seriously comfortable. I highly recommend them, especially if you just aren't sure about leopard and want to ease into it.

Flats: Old Navy, $19.94
I hope this post will help you find some great deals! What fall fashion trend are you most excited to try?

Wednesday, September 5, 2012

Home Study Sammies

I am jokingly calling this my Home Study Sammie because this is what I made yesterday. Ha! Actually, I've been making this sandwich for years. I don't know where I first heard about it, but it's delicious and great for parties.

Usually, I make this on very small rolls or the little hawaiian bread that you can buy. When I went to pick up some hawaiian bread I found that they now have hawaiian hamburger buns, sub rolls and sandwich rolls! I ended up getting the hamburger buns because I liked the shape.

This recipe will make 6 large sandwiches (using hamburger bun style hawaiian rolls) or 12-18 mini sandwiches (perfect for a tailgate or football party!).

Hot Ham & Cheese Sliders

For the Sandwich:
Rolls (see above for amount)
3 slices of ham per sandwich (2 slices for smaller sandwiches)
1 slice of swiss cheese per sandwich (half a slice for smaller sandwiches)
Mayo

For the Sauce:
1 stick of unsalted butter
2 tablespoons minced yellow onion
2 tablespoons poppy seeds
2 tablespoons yellow mustard
1 teaspoon worcestershire sauce

Assemble sandwiches: put mayo on both sides of the roll.

Meanwhile, in a microwave safe bowl, melt butter. Whisk in onion, poppy seeds, mustard and sauce.

Put sandwiches in a pan or baking sheet where they will fit tightly together. You don't want space in between the sandwiches. Pour sauce (as much as you'd like) over the sandwiches. Sauce recipe is enough for 12-18, or you can use it on 6 large sandwiches.

Cover with foil and bake at 350 for 15-20 minutes or until the cheese has melted.

Sidenote: If you don't like swiss, I've made these with provolone and they are still very good!

Tuesday, September 4, 2012

Home Study Part 2

Today was the second and last part of our home study! As I promised, I'm here to share how it went. And because I'm a cooking fanatic, I'll be sharing what I made on tomorrow's blog post. =)
You aren't required to make lunch or provide anything for those who asked - I just love to feed people.

So, today started off with catching up on anything that was missed or need a more detailed explanation from our last visit. Basically, we've gone over how we met, dated, got married, our work, our personalities, our friends and family, etc.

Once we were all caught up, we moved on to the individual portion of the interviews. I stepped out so that Chris could go first (that way he could get back to work). I haven't had a chance to talk to him but I would guess that his questions were similar to mine. We talked about my childhood, my childhood friends, activities I was involved in, what my parents did, discipline, moving to Arkansas and our family.

I wasn't nervous at all this time, mostly because K is so nice. It just feels like I'm talking to a friend and telling her about my life. We didn't do another walk through of the house (some of you had asked me if we would, and I didn't know the answer) or anything.

So now, K will submit her report saying ... we are approved! Yay!!!
Related Posts Plugin for WordPress, Blogger...
 
Blogging tips